
All About Thermostat Anticipators
Published at 18:02 on 31 July 2024
What Is an Anticipator?
The first time I took apart a thermostat, as a teen, I noticed this mysterious “anticipator” adjustment inside the thing. It was calibrated in these weird decimal fractions from roughly
0.15 to 1.2.
How could an inanimate object anticipate the future? It seemed like magic! Moreover, when I tinkered with the control, the heater’s cycles got longer and shorter. It was almost as if the thermostat did really know what was going to happen as it turned the heat on! And just what was the significance of those strange numbers, anyhow?
It took embarrassingly long (years!) for me to figure it out. See illustration below:
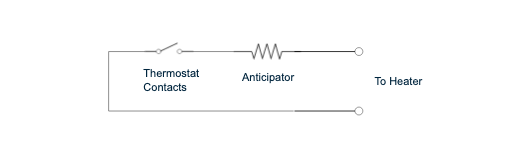
That’s right, the “anticipator” is nothing more than a tiny electric heater in series with the switch contacts on the thermostat.
How Does the Anticipator Work?
When the switch closes, the tiny heater is placed in series with the current flowing through the main heater’s relay coil. This causes current to flow through the tiny heater, and it heats up. This helps counter the thermal mass of the thermostat itself by heating it up, too, hopefully approximately in tandem with the air inside the building. The thermostat therefore reacts faster to what the heater is doing, as if it is anticipating future heating.
What Are the Strange Numbers on an Anticipator Scale?
They mark the recommended starting set point for a given current draw for a standard 24-volt system, as measured across the thermostat when it is open (i.e. not calling for heat).
Because anticipators must run on a traditional two-wire thermostat circuit, they must be placed in series with the thermostat switch point and the load the thermostat switches. Because this is a series circuit, more anticipator resistance means more total series resistance. This means that the overall circuit uses less power, and that the thermostat’s anticipator consumes a greater fraction of that power.
Somewhere between the minimum and maximum settings, anticipator heating is maximized, and somewhere between no anticipation and maximum anticipation is the proper value for a given situation. There are so many site-specific particulars that it is not possible with certainty to say in advance what the optimum setting is; all one can do is arrive at a good first guess. Sometimes that guess will be correct, sometimes it will take further refinements to arrive at the correct value.
For a high current system, only a small amount of resistance suffices. At 1.2 amps, even a small amount of resistance heating is excessive. In fact, there will probably be enough heating from the switch points’ resistance to act as a sufficient anticipator. So the 1.2 setting is for no (extra) anticipation, i.e. no extra series resistance. The anticipator is bypassed at this setting.
For a millivolt system, there is both limited power and limited voltage available. Voltage drop already can be a problem with millivolt systems, even without an anticipator. So dedicated millivolt thermostats do not have an anticipator, and millivolt-capable thermostats have instructions saying to use a setting of 1.2 on a millivolt system.
For a low current system, significant resistance is needed to extract enough power to get significant heating in the anticipator. So the lowest numbers select the maximum extra resistance.
What about the instructions that say to set the anticipator to 0.3 for electric, 0.4 for gas or oil heat, and so on?
Those are the recommended starting set points if you don’t have an ammeter reading or an existing thermostat setting to use.
What is the meaning of “longer?”
It denotes an arrow pointing to the direction to move the setting to make heating cycles longer. Note that the word “longer” is, perversely, often at the end of the scale that offers the shortest cycles (i.e. the most anticipation). It is the arrow pointing to the direction with which to move the setting to get longer cycles that counts.
Which setting is correct?
Whichever one works best! Start with one of the set points recommended by the thermostat manufacturer, but remember that they are only recommended ones. What is best depends on the particulars of your system (different ones draw different currents), your thermostat, your house, and where in your house the thermostat is mounted. There are so many particulars that it is impossible to say in general.
If you have an existing thermostat with an anticipator, copy its setting. If you have an ammeter, use that to determine a setting. If you have neither, use the instructions that came with your thermostat and set it according to your heat type. Failing all that, use whatever the thermostat happens to be set at as you got it.
What happens? Is temperature regulated properly? Congratulations, you’re at the correct setting! Don’t touch that anticipator adjustment! Does the heat run too long and cause temperature overshoot? Move it to a lower number. On a cold day or morning, does the heat tend to turn off too soon, forcing you to turn the thermostat above a set point in order to reach it? Move it to a higher number.
If you find it necessary to experiment with settings, take notes. It often takes several days of experimenting to arrive at the optimal setting.