Ring V.2.0

Published at 11:47 on 17 May 2018

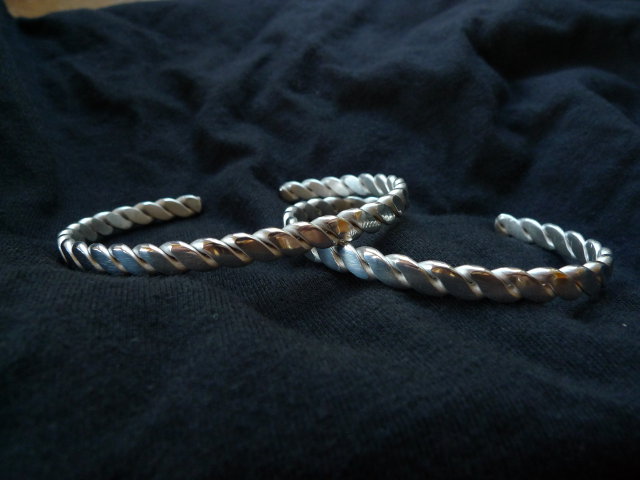
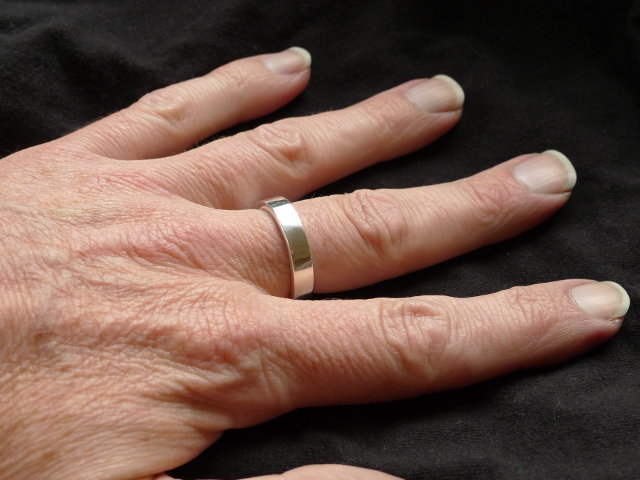
This is the eventual result of my having melted down scrap silver on the carbon block (see most recent post). That, plus a lot of forging and a fair bit of finishing.

Nice to have one that’s no longer overly thin and which is of fairly uniform thickness, because this time I didn’t run out of material (I had more scrap to work with).

Coat Charcoal Blocks with Boric Acid to Prevent Burning

Published at 20:09 on 16 May 2018

I bought a charcoal block to do some fusing of sterling silver on.

I’ve tried fusing metals on the firebrick that I normally use as a heat-resistant surface when soldering and annealing, and have found that sometimes the molten metal flows into the interstices between the grains in the brick and then, when solid, sticks to it. The result is virtually impossible to remove without some bits of firebrick material embedded in it. Moreover, the firebrick itself has acquired an undesired divot in its surface.

The charcoal block avoids that problem neatly, but it has a problem of its own: being charcoal, it catches fire. Even if I put the glowing/burning bits out with a wet finger, some of the surface has already combusted into carbon dioxide and literally vanished into thin air. A charcoal block’s surface thus quickly becomes unusably irregular.

Yesterday the idea came to me to coat one of the remaining good surfaces of my charcoal block with boric acid barrier flux and to set it alight. My theory was that since borates are used in fire retardants (and I believe in the antiafterglow compound that matches are treated with), the boric acid which would be deposited by doing the above was likely to prevent the carbon from catching fire.

It does! Plus, the porous surface of the charcoal absorbed a significant amount of flux, so the whole thing burned very prettily with a large green flame that lasted about a minute and put on quite the show.

Soldering? Brazing? Welding? What?

Published at 21:27 on 4 February 2014

Just to confuse neophytes, different trades use different words for the same process as well as the same word for different processes.

Soldering as the electronics and plumbing fields calls it is using a metal that melts at under 500 °F and which is relatively thick and capable of filling gaps when it melts, but which bonds relatively weakly with the metals being joined.

Soldering as the jewelry field calls it uses a metal that melts at over 1,000 °F and which is thin, runny, and not capable of filling large gaps when it melts, but which bonds very strongly with the metals being joined. Provided you can have the necessary tight fit, it can make a bond as strong as a weld.

Brazing as the plumbing field calls it is the same thing as what jewelers call soldering.

Brazing as welders call it is using brass or bronze to join parent metals which are typically not brass or bronze and which melt at higher melting points than brass or bronze. It has the advantages of both brazing (as plumbers call it) and soldering (as plumbers and electricians call it): it both bonds very strongly and is good at filling gaps. The disadvantage is that it doesn’t melt easily; you need an oxy/acetylene torch to do brazing in the welder’s sense.

Welding is melting the two pieces of similar parent metal together, and often adding additional similar metal as filler. It makes a joint almost indistinguishable from the parent metal, is every bit as strong as the parent metal, and fills gaps well. But it takes the most heat of all, either an oxy/acetylene flame or an electric arc.

This all confused me to no end for a long time. I wondered how jewelers could get away with hammering on soldered butt joints; I had soldered things many times in working with electronics and knew soldered joints were nowhere near strong enough to stand such treatment. And what was the deal with those “brazing rods” for sale near the propane torches? I knew a mere propane torch couldn’t braze; you needed oxy/acetylene for that!

Copper-Phosphorus Brazing Rod: Great Stuff

Published at 21:06 on 4 February 2014

I ran across this page a couple weeks ago. The rub is that jewelry-supply places only sell copper solder in insane quantities (basically, a near-lifetime supply for a mere hobbyist). I would have already ordered a small amount of it, anyhow.

Then I got to thinking. I’ve noticed this item at my local hardware store, in the torch section. Its ingredients list is basically the same as the copper jewelers’ solder. That it’s called “brazing rod” is no big deal: what jewelers call “soldering” is the same operation that plumbers call “brazing”. The per-unit price is a bit steep for those small retail packs, but it’s a good way for me to see if the stuff works well for me without having to buy a lifetime supply.

And indeed it does work well. The color doesn’t match copper wire exactly, but it’s a lot closer match than bright white silver solder. It flows well without flux, too… provided you heat it sufficiently. (You need to get things to 1400°F/760°C or so, i.e. cherry-red-hot, for it to flow readily, but with a little patience a propane torch can do this.) Those hardware store rods are at the upper end of thickness for jewelry use, but usable they are.

And it turns out that if you look around a little, you can find packages of such rods at about half the cost per pound of the jeweler’s solder. So I’ll probably order some. It’s still a lifetime supply, but one purchased at less cost to me.

If you’re tempted to do the same thing, be sure you’re ordering the 1/16″ rods. Even those are a tad on the thick end for jewelry use (and really may be too much for fine jewelry; I’m using them on largish pendants where I don’t mind a little excess). The typical size is 1/8″ diameter, which is simply way too big for any jewelry use.

The Torch

Published at 10:29 on 12 January 2014

Ahh, fire. I’ve always been fascinated by it and it would be dishonest to deny that part of the attraction of experimenting with jewelry making is that it will involve using fire.

Professional-grade jewelers’ torches all tend to have two problems: First, the price. It’s justifiable to spend hundreds of dollars on a tool you will be using daily to earn your living. It’s far more difficult to justify the expense for one hobby out of many. Second, the gas or gasses. There’s basically two options: propane and oxygen or acetylene and air. The first requires a large high-pressure oxygen tank of the sort that’s banned in most residential strictures. The second requires an acetylene tank, which is also typically banned by fire codes. You need a dedicated studio space to use each. Again, that’s a completely reasonable expense if jewelry is your business, but hard to justify if it’s just a hobby.

The alternative generally recommended for the rest of us are small butane torches of the sort used by chefs to caramelize crème brûlée. The trouble with those is that the fuel supply is in the handle of the torch. Note I said “fuel supply” and not “gas supply”; the butane is actually a liquid under pressure. That’s significant, because if you fail to hold the torch sufficiently upright, the liquid will get into the torch nozzle and either cause a surge of flame or make the torch go out.

I’ve used such torches before and I’ve found it awkward to be forced to always hold the torch upright. I want the freedom to hold the torch head at whatever angle best suits me, and that means using a torch with a hose between the fuel supply and the head.

Thankfully, there’s a third option out there: the Orca Torch, sometimes marketed as the “E-Z Torch” or the “Whale Torch”. It doesn’t require bottled oxygen and it can run on the same sort of disposable propane cylinders my Coleman camp stove uses, which can be purchased at my local hardware store. It’s not as good as a professional jewlers’ torch, but it’s good enough for me. And the hose lets me wield it at whatever angle is most natural.

One word of caution: there’s lots of bait-and-switch artists out there who will sell you less than a complete torch outfit. In order to have an Orca Torch you can actually use, you need all of: the torch head, a set of three nozzles, a hose, and an adapter to let you connect the hose to either a refillable tank or a disposable cylinder.

The link above is from a company whose page for the torch lists the complete outfit and which openly says that you need to order a tank adapter as well. It’s the source I chose for the torch, because of their evident honesty.

There is another torch option you may run across at your local hardware store, such as this item. The problem is that oxygen’s boiling point is very low, so unlike with propane, you can’t hold it as a liquid under a relatively low pressure; only a limited amount of compressed oxygen gas can be stored in a thin-walled disposable cylinder. Thus, these torches are best avoided for the simple reason that the disposable oxygen cylinders they use need very frequent (as in every 8 minutes of torch use) replacement.

The Bench and Workspace

Published at 10:02 on 12 January 2014

I live in an apartment so I don’t have a garage or basement to turn into a workspace. I do have a spare bedroom which I mostly use as a home office but which had room for a small work bench, so I decided to make a corner of that room my workspace.

First, one needs a bench. If you’re going to do anything other than the most basic jewelry making, you’re going to need to solder and anneal things. That involves using a torch, molten solder, getting pieces of metal red-hot, cutting/sanding/filing, and other messy tasks. You don’t want to do things like that on any item of fine furniture you don’t want to ruin with burn marks and dents.

I chose Harbor Freight Item No. 60723 as my bench. First, it’s small for a work bench, demanding only 4 linear feet of space. That’s important; most benches take up 6 or 8 feet. Space is at a premium for me. Second, it has a pegboard back. That lets me have a pegboard without drilling holes in my landlord’s walls and getting zinged for damage when I move out. The latter point was a huge plus for me since a pegboard was a must for me and I was trying to design a way to have a one without drilling holes in the walls. When I ran across this bench, I knew instantly my quest for both bench and pegboard had been resolved.

The downside is it’s not a top-quality item. That’s OK for me, because I’m not in my long-term home yet. I don’t want to spend lots of money on anything which might end up being suboptimal in whatever longer-term home I move into in the coming year or two. The bench is sturdy enough.

Next comes the floor. Or rather, the carpet. I will be producing metal filings and occasionally dropping globs of molten solder or red-hot metal items onto the floor (the latter two not deliberately, of course, but “Oops!” happens). A single such “Oops!” and there goes a chunk of cash when I get zinged for having destroyed the carpet in the spare room at move-out time.

My solution was to purchase a standard 4 by 8 foot sheet of plywood and have it cut 2 feet from the end. The big piece went on the floor under and extending 4 feet in front from the bench. The small piece went on top of the bench to provide a surface to protect the one the bench came with.

I’ll add a photo soon showing the completed set-up.


Re-Visiting Metalworking

Published at 09:43 on 12 January 2014

I played with making jewelry out of hardware store items a bit about five years ago. The results got noticed and got approving comments, but at the time I was too wrapped up in other things and basically put that embryonic hobby on hold until later. I had (and still have) plenty of hobbies and interests competing for limited time.

Last fall I decided that “later” meant the coming winter. So I’ve been slowly acquiring the things I need to experiment more with making jewelry, starting with a workbench and tools. Since what I’m doing is unconventional (mainly copper and brass, while most resources focus on silver), I thought it might be useful to relate my experiences and research here. I plan on doing so in subsequent articles under the category “metalworking”.